COVERS, which we want to take off for washing, must be fitted with practical fasteners. They must be appropriate to the type of material. The fasteners with zippers or strong hooks are very durable. Softer, and often also decorative, there are buttons or bindings. Snaps or Velcro can be hidden at the seams. If, however, we intend to remove the cover or upholstery rarely, one seam can be left free, sew it on the outside with a slightly visible stitch and tear it open if necessary.
Velcro
Velcro is a combination of two tapes, one of which is covered with a layer of microscopic hooks, and the other – such loops. Both sides stick together when they touch each other. Velcro is easy to apply and use, but for thin to medium thick materials they are too stiff. Both Velcro tapes cut from the meter are available on the market, like turnips in short distances – in various widths and colors.
SHORT SECTIONS OF VELCRO
1 FIRST SIDE OF THE FASTENER
We leave an overlap wider than the Velcro sections on the fastener. We mark places, where they are to be attached, and fasten Velcro with hooks to one plant. We sew them by hand.
2 SECOND SIDE OF THE FASTENER
Match the Velcro with the loops on the opposite side of the fastener, exactly opposite the first. We pin with pins and sew by hand. Sew short sections of Velcro at the spacing of every 5-10 cm.
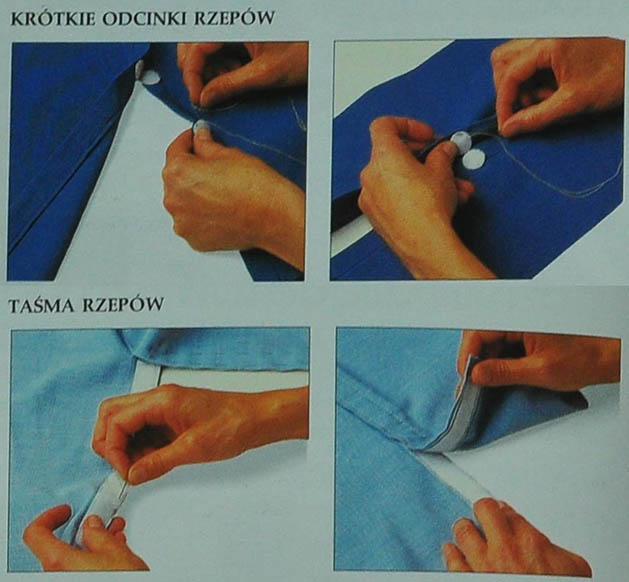 HOOK AND LOOP TAPE
1 FIRST SIDE OF THE FASTENER
The tape should be a little narrower than the clasp tab, one half of the tape is fastened to one half of the stock, baste and sew.
2 SECOND SIDE OF THE FASTENER
The other half of the tape is attached to the reserve on the opposite side of the seam. We check, whether it is opposite the first half, baste and sew.
Latches
They are made of metal or plastics in a limited range of colors and sizes. You can get them loose or sewn on a tape right away (the form is more convenient for fastening large holes). They are simple and easy to use, but not very durable, they open already under moderate pressure. Clasps are most suitable for bed linen and pillows.
SINGLE LATCHES
1 PLACE BOTTOM HALF CLIP
We mark what with pins 5-10 cm in distance 6 mm from the edge. Place the lower clasp cups on the lower clasp tab and sew them on.
2 MATCHING THE SECOND HALF
Upper, Place the convex parts of the clasp on the upper tab of the clasp. We check, that they are exactly opposite the lower halves.
 TAPE WITH CLIPS
1 THE FIRST HALF OF TAPE
The fastener overlap must be wider than the webbing. Roll up the shorter ends of the tape, underneath and pin the lower half of the tape to one overlap.
2 ADJUSTING BOTH PARTS OF THE TAPE
To fit parts of the tape, it's best to put the top half on the bottom half and fasten the clasps. Pin the upper part from the left side with pins and tuck the ends underneath.
3 SEWING ON BOTH TAPES
We undo the latches, Baste and sew the edges of the tapes. So that the tapes do not wrinkle, we sew both to the same side. You can use the foot for sewing in zippers.