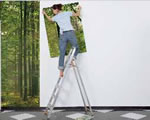
How to stick photo wallpapers?
1. Substrate preparation:
a. New walls – walls covered with gypsum plaster, plasterboards and other absorbent surfaces should be primed with a suitable agent or wallpaper glue only.
b. Painted walls – wash the walls with paint soap (in proportions 50-100 g/1 liter of water). We do this from bottom to top. We wipe the wall with sandpaper, to facilitate the bonding of the glue.
c. Previously wallpapered walls – we use wallpaper remover. We wet the wallpaper with a sponge or brush. Turn off the power before wetting the wall, we dismantle switches and sockets and protect the wires with insulating tape. After soaking (15 min.) we remove the wallpaper with a spatula, starting from the top.
2. wallpapering:
a. When gluing, a wallpapering table will come in handy.
b. Before sticking the photo wallpaper, unfold all its parts (bryty) and check, have no obvious defects (deformation, discoloration, etc.) Any complaints are considered by the manufacturer only when returned in the original packaging and complete goods.
c. Typical wallpaper glue should be dissolved in 2 liters of cold water (slowly pouring and mixing) half an hour before gluing, unless the manufacturer's instructions indicate otherwise.
d. We start from the edge of the door, window or in a corner. Glue the next sheets with an overlap (2-3 mm).
e. Using a plumb (thread plus weight) draw the line of the photo wallpaper edge at the window or door. The distance from the window or door should be equal to the width of the wallpaper strip minus 1-3 cm, because it is possible to incorrectly verticalize the window joinery.
f. Use a brush or brush to apply the glue. We smear with glue so as to avoid long soaking of the wallpaper. Maintain the same soaking time for each panel, approx. 2-3 minutes after smearing. Do not fold while the lubricated elements are soaked.
g. Apply the first upper panel exactly to the drawn line. The correctness depends on the accuracy of this step (horizontal) gluing the photo wallpaper . We press for a moment, until the glue begins to set.
h. Use a wallpaper roller or a fur roller for emulsion to press the wallpaper. Do not do this with a rag. We remove air bubbles from top to bottom and from the center to the edges.
i. We also press the joints with a wallpaper roller. Due to the presented wallpaper pattern, we remember about precise joining.
h. Cut off excess wallpaper with a knife, and the surplus of glue is immediately removed by gently using a damp cloth.
3. The most common mistakes:
a. Bubbles under the surface of the wallpaper, which do not give up “push out” – soaking time too short (the wallpaper grew on the wall instead of the floor) – this effect will partially disappear after the wallpaper dries, but larger bubbles will remain.
b. Visible places of connection of individual panels – panels were glued without “bookmarks” or glued on “bookmark” moving towards the window (the connections then cast a shadow).
c. Unequal size of individual panels – the same soaking time of the wallpaper was not maintained.