Both buttons, and buttonholes should be placed very carefully, so that the clasp does not open. To strengthen the buttonholes, you can protect their edges with two layers of fabric and overcast with a knitted stitch. Many sewing machines have special equipment for sewing buttonholes. Roll loops can sometimes be used instead of holes.
MACHINE SHOEDING HOLES
1 DETERMINING PLACES FOR HOLES
First, we designate a place, where you want the center of the buttonhole, and adjust the button to it. We mark the width of the button with an amendment to its thickness and a small margin for overcasting the edges.
2 CUTTING BUTTONHOLES
We sew both sides of the marked places with a machine stitch for making buttonholes. We pierce the hole with a special device or small ones, sharp scissors. We cut the buttonhole along the entire length.
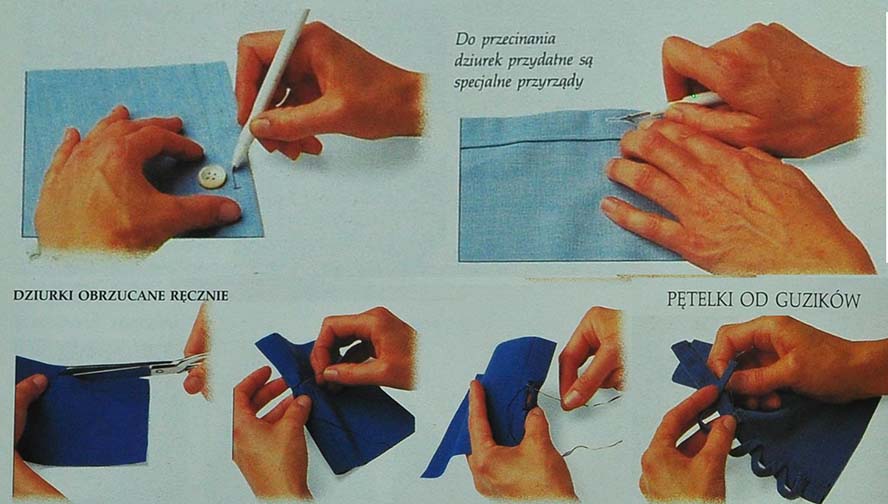 HAND CREWED BUTTONHOLES
1 CUTTING A BUTTON
Use a tailor's soap to mark the place, where the buttonhole is to be, and we determine its length. We cut out the hole for the buttonhole with small ones, with sharp scissors or a special tool.
2 DESIGNATION OF EDGES
A special thread for sewing buttonholes is useful for this. We hook it at one end of the cut – this, which can withstand a certain pressure. We pierce this end several times and start overcasting with it.
3 OVERLOADING
We apply a knitted stitch along one edge of the buttonhole. The other end is also tight, we pierce several times, then we throw the same overcast and finish.
BUTTON LOOPS
We start with sewing the buttons in the places reserved for them on the edge of the opening. The roll is attached to the corresponding places on the opposite side of the opening, giving it the form of loops. We adjust the shape and spacing of the loops to the shape and spacing of the buttons. We baste them and sew them on.